데이터 시각화를 위한 차트 플러그인 중 가장 오래, 많이 사용 해왔던 차트가 highcharts 입니다.
저희 회사에선 2년전까지만 해도 개발자들이 직접 구현을 하였고, 저는 폰트, 색상 등 디자인과 최대한 비슷하게
구현하도록 가이드만 따로 전달하곤 했어요.
디자인과 얼~추 비슷한 모양새만 한 차트를 보며 이건 안되겠다 싶어 직접 만지작 거렸고,
이제는 디자인을 반영한 차트를 직접 그려서 작업 전달을 하고 있습니다.
원하는 방향을 적용하기 위해 api docs와 구글링을 하며 알게된 것들을 나누고,
복기할 요량으로 포스팅 합니다.
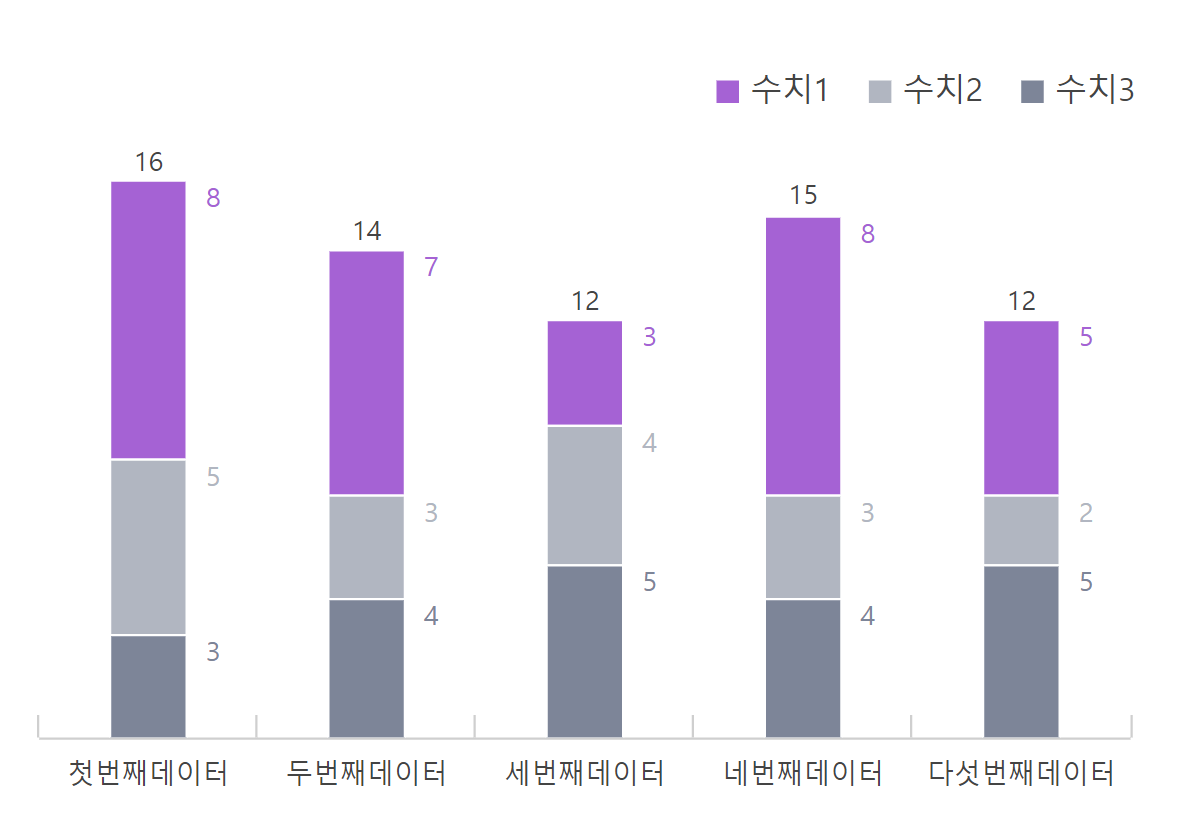
자주 사용하는 기본 옵션/세로 스택 컬럼 차트 옵션

function columStackedBar() {
	//차트 색상 지정
	Highcharts.setOptions({
		colors: ['#a562d4', '#b1b6c1', '#7d8598']
	});

	// Set up the chart
	var chart = new Highcharts.Chart({
		chart: {
			renderTo: 'columStackedBar',//차트가 그려질 태그의 ID 지정
			type: 'column',//차트 타입 지정
			margin: [0, 10, 90, 5],//차트 외곽 마진 설정 - 상, 우, 하, 좌
			style: {//차트 전체 스타일 지정
				color: '#444',
			    fontFamily: 'notoSans',
				fontWeight:'400'
			},
			backgroundColor:'rgba(255, 255, 255, 0)'//차트 배경 투명 지정(기본이 흰색으로 되어 있음)
		},
		credits: {enabled: false},//highchart 워터마크 숨김처리
		title:{//차트 타이틀. 미지정시 ''으로 남겨두면 됨
			text: ''
		},
		legend: {//범례
			floating: true,//범례를 차트 영역 위로 띄울 시 true 지정.
			align: 'right',//수평 정렬 지정
              verticalAlign: 'top',//수직 정렬 지정.
              symbolRadius:0,//범례 심볼 radius 지정
              symbolWidth:10,
              symbolHeight:10,
              itemDistance:17,//범례 간 간격 지정.
              itemStyle: {
              color:'#444',
              fontSize: '14px',
              fontWeight:'400'
            },
            x: 10,//가로 위치 지정.
            y: -3,//세로 위치 지정.
       },
		xAxis: [{
        categories: ['첫번째데이터', '두번째데이터', '세번째데이터', '네번째데이터','다섯번째데이터'],
          labels: {
            y: 20,
            style: {
            color:'#444',
            fontSize: '12px'
          },
		},
        lineColor: '#cfcfcf',//x축 선 색상 지정.
        gridLineWidth: 0,// x축 그래프 뒤에 깔리는 선 굵기 지정.(0으로 지정 시 사라짐)
        tickWidth: 1,//x축 label 사이 표지자 너비(0으로 지정 시 사라지며, 차트 타입에 따라 default로 지정되어 있을 수 있음)
        tickColor: '#cfcfcf',
        tickPosition: 'inside'// outside가 default 이며, x축 선 기준 아래를 바라봄. inside는 위를 바라봄.
        }],
        yAxis: [{
          //y axis 왼쪽
            title: {
            text: ''
          },
          labels: {
          	enabled: false//label 미사용 시 false로 지정.
          },
          stackLabels: {//스택 바에 사용하는 label 설정.(stacked bar 필수 설정 옵션)
            enabled: true,
            y:5,
            style: {
              fontSize: '12px',
              fontWeight: '500',
              color:'#444'
            }
          },
          gridLineWidth: 0// y축 차트 뒤에 깔리는 선 미사용 시 0으로 지정.
        }],
        plotOptions: {
          column: {// 컬럼 차트 전체 옵션 지정
                stacking: 'normal',//stacked bar 필수 설정 옵션(default undefined)
                dataLabels: {//컬럼 바 각각의 label 옵션 지정.
                enabled: true,
                style: {
                fontSize:'12px',
                fontWeight:'500',
                textOutline:0,// label 수치의 outline 제거 0으로 지정.

                }
              }
          },
          series: {
              pointWidth: 34 //bar 너비 지정.
          }
		},
        series: [{
          name: '수치1',
          data: [8, 7, 3, 8,5],
          dataLabels: {//바 상단의 수치값 개별 지정.
          enabled: true,
          format: '{y}',//수치 표현 포맷
          color: '#a562d4',
          align: 'right',
          verticalAlign: 'top',
          //위치 지정
          x:20,
          y: -6,
        }
        }, {
          name: '수치2',
          data: [5, 3, 4, 3, 2],
          dataLabels: {
          enabled: true,
          color:'#b1b6c1',
          align: 'right',
          verticalAlign: 'top',
          //위치 지정
          x:20,
          y: -6,
        }
        }, {
          name: '수치3',
          data: [3, 4, 5, 4, 5],
          dataLabels: {
            enabled: true,
            color:'#7d8598',
            align: 'right',
            verticalAlign: 'top',
            //위치 지정
            x:20,
            y: -6,
          }
        }]
        });

  }
- 기본 설정 및 스택 컬럼 바 옵션입니다. 상세 설명은 위 코드를 참고해주세요!
stacked bar를 설정하기 위해서는 stackedLabel과 stacking 설정이 필수입니다.
(스크립트에 지정된 noto sans 폰트는 위 그래프 이미지의 폰트와 다릅니다.)
도넛 차트 옵션

function dounutChart() {
  //차트 색상 지정
    Highcharts.setOptions({
    colors: ['#d470cc','#3f77cb']
  });
  // Set up the chart
  var chart = new Highcharts.Chart({
  chart: {
      renderTo: 'dounutChart',
      type: 'pie',/도넛 차트도 원형이기 때문에 pie로 지정함.
      margin: [0, 5, 5, 5],
      spacingRight:0,//차트 우측 여백 지정(default 10)
      style: {
      color: '#444',
      fontFamily: 'notoSans',
      fontWeight: '400',
    },
  	backgroundColor:'rgba(255, 255, 255, 0)'
  },
  	credits: {enabled: false}, //highchart 워터마크 숨김처리
    title: {
    	text: '',
    },
    legend: {
      layout: 'vertical',//범례 세로 정렬 시 vertical로 지정.(default horizontal)
      align:'center',
      verticalAlign: 'middle',
      x: -4,
      y: -2,
      itemMarginTop: 5,//범례 margin top 지정(bottom도 존재.)
      symbolHeight: 10,
      symbolWidth: 10,
      symbolPadding: 5,
      symbolRadius: 0,
      itemStyle: {
        color: '#444',
        fontSize: '14px',
        fontWeight:'normal'
      }
     },
     plotOptions: {
       pie: {//도넛(파이)차트 전체 옵션 지정.
       dataLabels: {
       enabled: true,
       distance: -20,
       },
       	showInLegend: true//범례 show/hide 설정. (series 내에서 개별 지정도 가능.)
       }
     },
     series: [{
       type: 'pie',
       name:'금감원 취하 현황',
       innerSize: '50%',//도넛 차트 지정시 내부 구멍 너비를 설정.(도넛 차트 필수 지정 옵션)
       data:[
       	{
          name: '수치1',
          y: 47,
          dataLabels: {
            y:-35,
            x: 25,
            color:'#d470cc',
          }
        },
        {
          name: '수치2',
          y: 34,
          dataLabels: {
          	color:'#3f77cb',
          }
        }
        ],
        dataLabels: {
          enabled: true,
          format: '<span class="d-label">{point.name}</span> : {y}',//label의 포맷을 "데이터 명 : y"로 지정해서 사용.
          align: 'center',
          //세로 위치 지정
          y:-30,
          x: -40,
          style: {
         	 fontSize: '13px',
            fontFamily: 'notoSans',
            fontWeight: '400',
          }
        }
	}]
});
}
- 도넛 차트 지정에서 제일 중요한 것은 series 옵션 내에서 "innerSize"를 지정하는 것입니다.
0~100% 사이의 값으로 지정이 가능하고, 값이 커질 수록 구멍의 너비가 커집니다.
가로 스택 컬럼 차트 옵션

 function horiStackedBar() {
   //차트 색상 지정
     Highcharts.setOptions({
     colors: ['#3f77cb','#d470cc']
   });
   // Set up the chart
   var chart = new Highcharts.Chart({
     chart: {
       renderTo: 'horiStackedBar',
       type: 'bar',//가로 column 지정은 "column"이 아닌 "bar"
       margin: [20, 10, 25, 115],
       style: {
         color: '#444',
         fontFamily: 'notoSans',
         fontWeight:'400'
       },
     backgroundColor:'rgba(255, 255, 255, 0)'
   },
   //highchart 워터마크 숨김처리
   credits: {enabled: false},
   title:{
  	 text: ''
   },
   legend: {enabled: false},
   xAxis: [{
   		categories: ['첫번째데이터', '두번째데이터', '세번째데이터', '네번째데이터','다섯번째데이터',],
        labels: {
        	y: 5,
            style: {
            	color:'#444',
                fontSize: '14px',
             },
		 },
         lineColor: '#cfcfcf',
         gridLineWidth: 0,
         tickWidth: 1,
         tickColor: '#cfcfcf',
         tickPosition: 'inside'
     }],
     yAxis: [{
     	//y axis 왼쪽
        title: {
        	text: ''
         },
         labels: {
         	enabled: false
         },
         stackLabels: {
         	enabled: true,//stacked bar 필수 설정 옵션.
            x:-8,
            y:1,
            style: {
            	fontSize: '12px',
                fontWeight: '500',
                color:'#444'
            }
          },
          gridLineWidth: 0
      }],
      plotOptions: {
      	dataLabels: {
        	enabled: true,
            style: {
            	fontSize:'12px',
                fontWeight:'500',
                textOutline:0,
             }
         },
         series: {
         	stacking: 'normal',//stacked bar 필수 설정 옵션.(default undefined)
            //bar 너비
            pointWidth: 34,
         }
       },
       series: [{
       		name: '첫번째데이터',
            data: [8, 8, 8, 8,5,],
            //바 상단의 수치값
            dataLabels: {
            	enabled: true,
                format: '{y}',
                color:'#3f77cb',
                style: {
                	fontSize:'10px',
                    fontWeight:'400',
                },
                align: 'right',
                verticalAlign: 'top',
                //위치 지정
                x:1,
                y: -20,
             }
             }, {
             	name: '두번째데이터',
                data: [3, 3, 3, 3, 3,],
                dataLabels: {
                	enabled: true,
                    color: '#a562d4',
                    style: {
                    	fontSize:'10px',
                        fontWeight:'400',
                    },
                    align: 'right',
                    verticalAlign: 'top',
                    //위치 지정
                    x:1,
                    y: -20,
                  }
              }]
			});

}
- stacked horizontal bar 설정은 차트의 타입을 "bar"로 설정하는 것부터가 시작입니다.
그 외의 필수 설정은 stackedLabel과 stacking 옵션입니다.
깔대기 차트 옵션

function funnelChart() {
  //차트 색상 지정
  Highcharts.setOptions({
  	colors: ['#7944c9','#575bb9','#3f77cb','#d462cb']
  });
  // Set up the chart
  var chart = new Highcharts.Chart({
    chart: {
      renderTo: 'funnelChart',
      type: 'funnel',//깔대기 차트 타입
      margin: [5, 5, 50, 40],
      style: {
        color: '#444',
        fontFamily: 'notoSans',
        fontWeight: '400',
    },
    backgroundColor:'rgba(255, 255, 255, 0)'
  },
  	credits: {enabled: false},//highchart 워터마크 숨김처리
    title: {
    	text: '',
    },
    legend: {
    	layout: 'vertical',
        align:'right',
        verticalAlign: 'middle',
        x: 8,
        y: -2,
        itemMarginTop: 5,
        symbolHeight: 10,
        symbolWidth: 10,
        symbolPadding: 5,
        symbolRadius: 0,
        itemStyle: {
          color: '#444',
          fontSize: '14px',
          fontWeight:'normal'
        }
	},
    plotOptions: {
    	series: {
        	dataLabels: {
            	enabled: true,
                format: '<span class="d-label">{point.name}</span> : {y}',
                align:'left',
                distance: '0',
                softConnector: false,//label과 차트 연결선 옵션(default true)
                connectorWidth:0,//label과 차트 연결선 너비(0으로 지정시 사라짐)
                style: {
                  fontSize: '12px',
                  fontWeight:'normal'
                },
             },
             center: ['40%', '50%'],//plot area 기준 정중앙에 위치한 차트의 위치 조정 옵션. (default x축:50%, y축:50%)
             neckWidth: '80px',//깔대기 하단 목 부분의 너비 지정.
             neckHeight: '25%',//깔대기 하단 목 부분의 높이 지정.
             width: '195px'
         }
	},
    series: [{
    	name: '',
        data: [
        	{
            	name: '첫번째데이터',
                y: 47,
                dataLabels: {
                  x: -225,
                  color:'#7944c9',
                }
             },
             {
             	name: '두번째데이터',
                y: 34,
                dataLabels: {
                  x: -190,
                  color:'#575bb9',
                }
             },
             {
             	name: '세번째데이터',
                y: 34,
                dataLabels: {
                  x: -145,
                  color:'#3f77cb',
                }
              },
              {
              	name: '네번째데이터',
                y: 34,
                dataLabels: {
                  x:-490,
                  color:'#d470cc',
                }
              },
              ]
        }],
	});
}
- 깔대기 차트 옵션은 구현하려면 추가적인 js 파일이 필요합니다.
* 다운로드 파일 사용 시 (다운로드 링크 : www.highcharts.com/blog/download/)
code\modules\funnel.js
위의 경로에 파일이 존재합니다.
*CDN 사용 시
<script src="https://code.highcharts.com/highcharts.src.js"></script>
<script src="https://code.highcharts.com/modules/funnel.js"></script>
위와 같이 highcharts.js 밑에 불러와서 사용하시면 됩니다.
세로 컬럼 + 기준선 차트 옵션

function columnWithLine() {
  //차트 색상 지정
  Highcharts.setOptions({
  	colors: ['#21b7fa', '#0357ad','#fa219c', '#1aba00']
  });
  // Set up the chart
  var chart = new Highcharts.Chart({
    chart: {
      renderTo: 'columnWithLine',
      type: 'column',
      margin: [0, 30, 30, 30],
      style: {
        color: '#333333',
        fontFamily: 'notoSans'
      },
    backgroundColor:'rgba(255, 255, 255, 0)'
  },
  credits: {enabled: false},//highchart 워터마크 숨김처리
  title:{
  	text: ''
  },
  legend: {
  	enabled: false//범례 미사용 시 false 지정.
  },
  xAxis: [{
    categories: ['수치1', '수치2'],
    labels: {
      y: 20,
      style: {
      	color:'#333',
      	fontSize: '13px'
      },
  	},
    lineColor: '#d1d1d1',
    gridLineWidth: 0,
    tickWidth: 1,
    tickColor: '#d1d1d1',
    tickPosition: 'outside'
 }],
 yAxis: [{
 //y axis 왼쪽
 gridLineWidth: 0,
 title: {
 	text: ''
 },
 labels: {
 	enabled: false
 },
 plotLines: [{//기준점 사용 옵션.
   color: '#fa219c',
   width: 2,
   value: 7,
   dashStyle: 'shortdash',//라인 스타일 지정 옵션
   zIndex: 5,
   label: {
     text: '7',
     align: 'right',
     x: -10,
     y: -6,
     style: {
     	color:'#fa219c',
     }
   }
 },
 {
 color: '#1aba00',
 width: 2,
 value: 4,
 dashStyle: 'shortdot',
 zIndex: 5,
 label: {
   text:'4',
   align: 'right',
   x: -10,
   y: -6,
   style: {
  	 color:'#1aba00',
 	},
 //useHTML: true,
 }
 }]
 }],
 plotOptions: {
   series: {
   	//bar 너비
     pointWidth: 47,//컬럼 너비 지정.
     groupPadding: 0.5//컬럼을 외곽 패딩 지정. 큰 값을 지정하면 컬럼 너비가 줄어들 수 있음.(오른쪽, 왼쪽/default 0.2)
   }
 },
 series: [{
   data: [10, null],
   name: '첫번째데이터',
   //바 상단의 수치값
   dataLabels: {
     enabled: true,
     format: '{y}',
     color: '#444',
     align: 'center',
     //세로 위치 지정
     y: 5,
     style: {
       fontSize: '12px',
       fontFamily: 'notoSans',
       fontWeight: 'normal'
     }
	}
   }, {
     data: [null, 5],
     name: '두번째데이터',
     //바 상단의 수치값
     dataLabels: {
       enabled: true,
       format: '{y}',
       color: '#444',
       align: 'center',
       //세로 위치 지정
       y: 5,
       style: {
         fontSize: '12px',
         fontFamily: 'notoSans',
         fontWeight: 'normal'
       }
     }
   }]
   });

}
- 기준선은 x, y, z 축에 모두 지정이 가능하다. 그리하여, 적용하길 원하는 축 옵션 내에 넣어준다.
선의 스타일은 원하는대로 지정 가능 하며, 하이차트에서 지원하는 종류는 총 11가지이다.
해당선의 샘플은 아래 jsfiddle에서 확인 가능하다.
Highcharts Demo - JSFiddle - Code Playground
jsfiddle.net
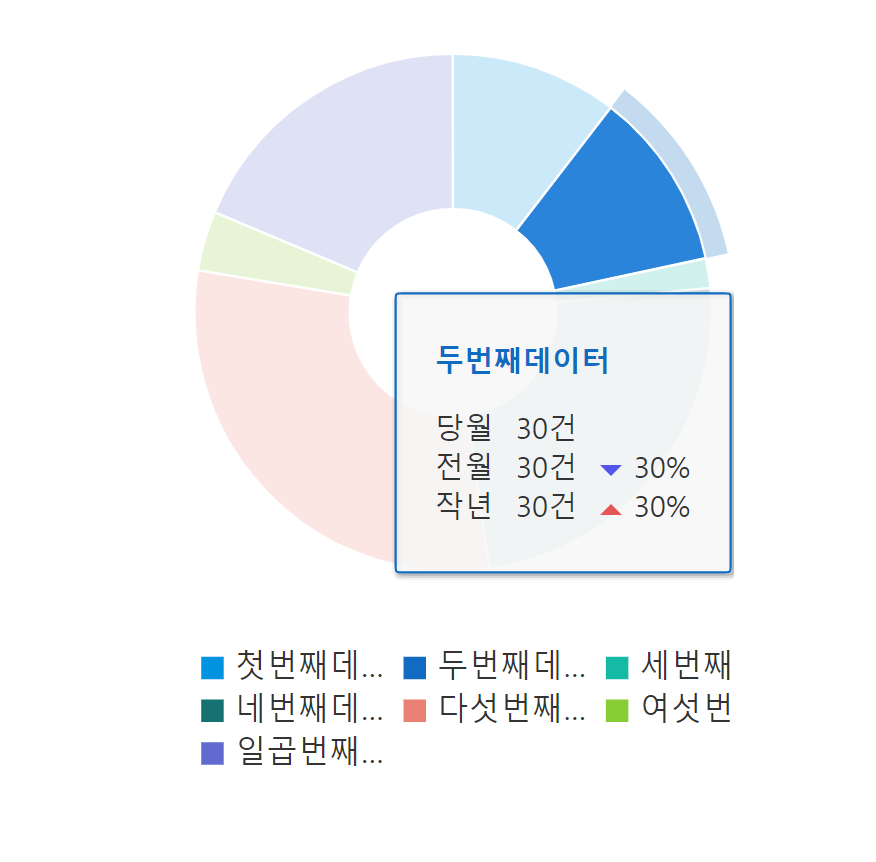
커스텀 툴팁 + 파이 차트 옵션

function pieWithCustomPop() {
  //차트 색상 지정
  Highcharts.setOptions({
 	 colors: ['#0093e0','#116cc1','#15baa4','#157270', '#ea8175','#87cd33','#616bcf']
  });
  // Set up the chart
  var chart = new Highcharts.Chart({
    chart: {
      renderTo: 'pieWithCustomPop',
      type: 'pie',
      margin: [0, 0, 100, 0],
      style: {
        color: '#333333',
        fontFamily: 'notoSans'
      },
      backgroundColor:'rgba(255, 255, 255, 0)'
    },
    credits: {enabled: false},//highchart 워터마크 숨김처리
    title:{
   	 text: ''
    },
    legend: {
      align:'left',
      verticalAlign: 'bottom',
      width: 300,
      x: -5,
      y:-25,
      itemWidth: 90,
      itemDistance: 0,
      symbolHeight: 10,
      symbolWidth: 10,
      symbolPadding: 5,
      symbolRadius: 0,
      itemStyle: {
        color: '#333',
        fontSize: '14px',
        fontWeight:'normal'
      }
	},
    plotOptions: {
    	pie: {
        allowPointSelect: true,//차트 데이터 선택 유무 옵션.
        dataLabels: {
          enabled: false
        },
        showInLegend: true,
        size: '100%',
     }
   },
   tooltip: {
   		useHTML: true,//툴팁 포맷을 html로 변경할 경우 true로 지정.(default false)
        formatter: function () {//커스텀 tooltip html
        	return '<p class="voc-tit" style="color:' + this.point.color + '">' + this.point.name + '</p>' +
            	'<ul class="voc-list">' +
                '<li>' + '<div class="figures-wrap"><span class="tit">' + '당월' + '</span>'+ '<span class="num">' + this.y + '건'+ '</span></div>' +'</li>' +
                '<li>' + '<div class="figures-wrap"><span class="tit">' + '전월' + '</span>'+ '<span class="num">' + this.y + '건'+ '</span></div>'+'<span class="voc-figures f-down">'+ this.y +'%</span>' +'</li>' +
                '<li>' + '<div class="figures-wrap"><span class="tit">' + '작년' + '</span>'+ '<span class="num">' + this.y + '건'+ '</span></div>'+'<span class="voc-figures f-up">'+ this.y +'%</span>' +'</li>' +
                '</ul>' ;
               }
        },
        series: [{
          type: 'pie',
          name:'금감원 취하 현황',
          innerSize: '40%',
          data:[
            ['첫번째데이터', 28],
            ['두번째데이터', 30],
            ['세번째데이터', 5],
            ['네번째데이터', 65],
            ['다섯번째데이터', 80],
            ['여섯번째데이터', 10],
            ['일곱번째데이터', 50]
          ]
         }]
    });

 }
- 커스텀 툴팁은 useHTML을 true로 설정한 뒤, fomatter에 HTML 코드를 넣어주면 됩니다.
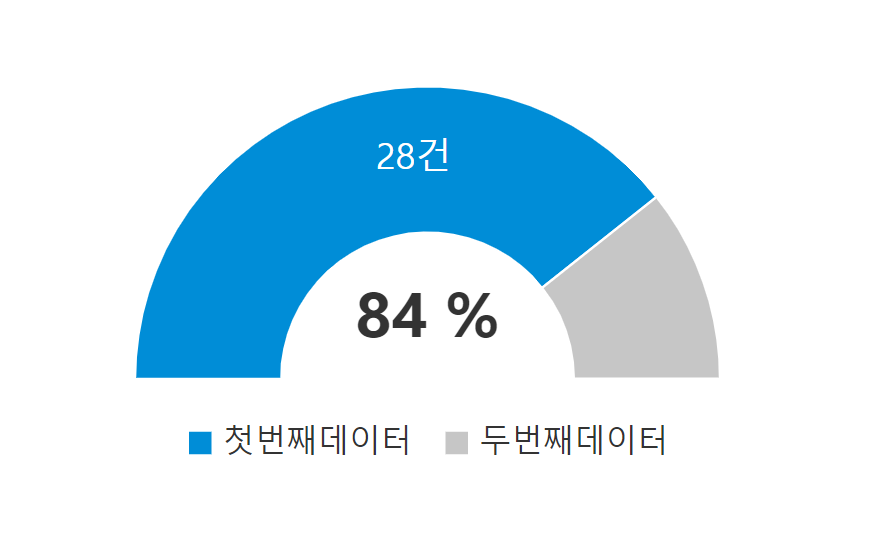
하프 도넛 차트 옵션

function halfPie() {
  //차트 색상 지정
  Highcharts.setOptions({
  	colors: ['#008dd7','#c6c6c6']
  });
  // Set up the chart
  var chart = new Highcharts.Chart({
    chart: {
      renderTo: 'halfPie',
      type: 'pie',
      margin: [0, 10, 30, 10],
      style: {
        color: '#333333',
        fontFamily: 'notoSans'
      },
      backgroundColor:'rgba(255, 255, 255, 0)'
    },
    credits: {enabled: false},//highchart 워터마크 숨김처리
    title: {
      text: '',
      align: 'center',
      verticalAlign: 'middle',
      y: 70,
      style: {
        color:'#333',
        fontSize: '28px',
        fontFamily: 'Segoe UI',
        fontWeight: 'bold',
        textOutline: false
      }
    },
    legend: {
      align:'center',
      verticalAlign: 'bottom',
      x: 0,
      y: -75,
      itemDistance: 15,
      symbolHeight: 10,
      symbolWidth: 10,
      symbolPadding: 5,
      symbolRadius: 0,
      itemStyle: {
        color: '#333',
        fontSize: '14px',
        fontWeight:'normal'
       }
     },
     plotOptions: {
     	pie: {
          dataLabels: {
            enabled: true,
            distance: -20,
          },
            startAngle: -90,//하프 도넛 앵글 시작 각도
            endAngle: 90,//하프 도넛 앵글 끝 각도
            center: ['50%', '75%'],
            size: '100%',
            showInLegend: true
           }
        },
        series: [{
          type: 'pie',
          name:'금감원 취하 현황',
          innerSize: '50%',
          data:[
            ['첫번째데이터', 28],
            {
              name: '두번째데이터',
              y: 7.61,
              dataLabels: {
             	 enabled: false
              }
            }
          ],
          dataLabels: {
            enabled: true,
            format: '{y}건',
            color: '#fff',
            align: 'center',
            //세로 위치 지정
            y:0,
            x: 30,
            style: {
              fontSize: '16px',
              fontFamily: 'notoSans',
              fontWeight: 'bold',
              textOutline: false
             }
          }
       }]
    });
    //setting title in data fomat(84 부분을 데이터로 변경 해서 사용)
    chart.setTitle({ text: '84' + '<span class="unit"> %</span>' });
}
- 하프 도넛은 일반 도넛 차트와 옵션 설정을 동일하며, plotOptions 내 startAngle, endAngle 만 지정해 주면 됩니다.
지금까지 제가 사용했던 타입별 하이차트 설정 방법이었습니다. 다른 종류의 차트도 많지만,
디자인을 다듬기 위한 기본 옵션 참고용으로 도움이 되었으면 좋겠네요.
'DEV > WEB' 카테고리의 다른 글
| [Gulp] 걸프를 활용하여 프론트엔드 개발 환경 조성하기 #1 (0) | 2021.03.30 |
|---|---|
| [Fullcalendar]풀캘린더 플러그인에서 툴팁 사용하기.(버전 4, 5 두 가지) (5) | 2021.02.13 |
| [Semantic UI] 모바일 디바이스에서 modal 팝업 스크롤링 안되는 현상. (0) | 2020.12.15 |
| [Cross browsing] 아이폰에서 input/textarea에 글자 입력 안되는 현상. (3) | 2020.12.13 |
| [Jquery] IE, Edge에서 width 값 인식 이슈. (0) | 2020.07.03 |